The Necessity of Water Changes
Water always passes through a filter and circulates in an aquarium where an aquatic plant layout is created. The filter removes impurities that float in water, organic materials that cause cloudy water, and detoxifies ammonia, which is harmful to fish and shrimp, all with the help of bacteria. However, it is difficult to maintain aquarium water in continually clean state with the work of the filter alone. Frequent water changes become necessary since the water tends to get dirty, especially when the biological filter was not well established shortly after the aquarium has been set up.
Regular water changes will be needed thereafter to remove excessive nitrate and phosphate that build up in the water and cause algae to proliferate. A water change also has a benefit of keeping the inside of an aquarium physically clean. Through siphoning during a water change, the dirt and algae that collect on the substrate and on the surface of the leaves of aquatic plants are removed. Additionally, the photosynthesis of aquatic plants appears to become more active through an infusion of fresh water through a water change. The water change frequency should be every two to three days initially after an aquarium has just been set up. Once the filter has been established, the water quality can be maintained through weekly or biweekly water changes. The volume of water per water change should be approximately 1/3 of the total water volume.
Water Changes for Nature Aquarium
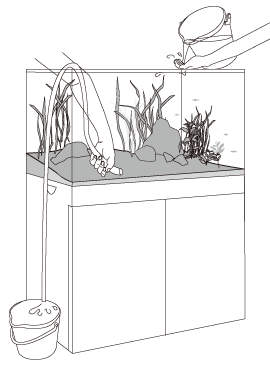
Water is drained with a hose (by siphon). Using various size hoses can make the work efficient, depending on the size of the aquarium and the purpose. Use a large diameter hose if the purpose is to drain water. A narrow hose is easier to use for suctioning out dirt in a tight area or sucking out algae. Algae on the glass surface should be cleaned before draining water. After 1/3 of the water is removed, adjust the temperature of the tap water and collect the water in a bucket. Remove residual chlorine in the water by adding Chlor-Off, and then pour the water into the aquarium. When changing water for a large aquarium, tap water can be added directly into the aquarium with a hose. However, be sure to adjust the temperature of the water and remove the residual chlorine.
The biological control of algae
The removal of algae is one of the purposes of a water change. However, it is difficult to eradicate all algae with it. During the first one to two weeks after an aquarium is set up, we must rely on water changes since the water quality problem precludes an addition of livestock. Once the water quality stabilizes, the use of certain livestock make algae control much easier. Yamato Numa Ebi (Caridina japonica) and Otocinclus are typical livestock that eat algae. Since they are good about eating diatoms that tend to develop during an initial set-up period of an aquarium, it would be nice to add them to an aquarium early. However, careful attention is required when adding them for the first time. Yamato Numa Ebi in particular is sensitive to the quality of water. It often will become lethargic on a piece of driftwood or a rock and will stop eating algae, or it dies from the effect of nitrite or residual chemicals remaining on the aquatic plants that have just been imported into the country. Frequent water changes are the only remedy in such cases. It is advisable to add just a few of these fish to an aquarium initially. More can be added later if they seem to be doing well. Adding a Siamese Flying Fox, which eats black beard algae, and Nerite snails, which eat green algae that grow on rock surfaces, in addition to Yamato Numa Ebi makes it easier to maintain a layout in a good condition.
Adding Fish to an Aquarium
When the water quality stabilizes in three to four weeks after the set-up of an aquarium, you can add fish that are the principal characters of a layout. We recommend that you check the water quality (nitrite and pH) before adding fish. If the biological filter is functioning properly, nitrite (NO2) will not be detected. If it is detected, it is advisable to wait before adding fish. Nitrite is highly toxic and harmful to fish. In an aquarium in which Aqua Soil is used as substrate, the pH may have dropped significantly. If the pH of the new aquarium is very different from that of the aquarium that fish came from, the fish may suffer from a pH shock. The fish’s eyes and slime coat on its body surface may turn cloudy, and the movement of its gills or the way it swims may become erratic. Therefore, the pH should also be checked before adding fish. If the pH of the water in the bag that store-bought fish came in and the pH of the new aquarium are very different, fish should be placed in a bucket after floating the bag in the aquarium to match the temperature and be acclimated to the new water by adding the tank water to the bucket gradually using airline tubing. If the fish is very sensitive to changes in water quality, the end of the airline tubing should be tied loosely so that the water drips slowly into the bucket.
Maintaining fish’s health
Regular water changes are essential for maintaining the health of fish. Water changes are performed safely by adding Chlor-Off, which removes harmful residual chlorine, and RIO BASE, which protects fish’s slime coating. Newly purchased fish may be weakened due to the stress of shipping. VITAMIX rich in vitamins and BLACK WATER that recreate the river water of tropical rainforests containing humic acid is effective for relieving the fish’s stress. Fish with damaged skin or mouths due to netting tend to suffer from bacterial infection if left untreated. We recommend adding Phyton Git that has an antiseptic property right after placing new fish to an aquarium to prevent such infection. Daily feeding is also essential for maintaining fish’s health. Highly digestible Fish Food AP that will not foul water or highly nutritious Fish Food AP Gold that will stimulate fishes’ appetite are suitable food for fish in Nature Aquarium. Both are available in three different granule sizes so that you can choose the right one depending on the size of your fish. The use of AP Glass makes feeding easy and neat.
Trimming Aquatic Plants
Overgrown aquatic plants are the biggest problem for maintaining Nature Aquarium. A hobbyist may worry that aquatic plants may not grow well in the beginning. However, once the growing conditions are met and aquatic plants start growing well, sooner or later the aquatic plants will fill up the entire space. This will destroy the composition of a layout and the swimming space for fish will be lost as well. This not only creates a problem for viewing, but it also causes the aquatic plants to decline in the lower parts where light does not reach well. Stem plants in particular grow very fast and fill up a space quickly. Therefore, they need to be trimmed early. Their stems should be trimmed to form bushes according to a desired composition. Repeated trimming promotes branching and their leaves become denser gradually. Although the plants do not look attractive right after trimming, they develop a lot of new buds in a short time and form beautiful bushes again. Glossostigma and Hair Grass that are often used in the foreground can be maintained by thinning their leaves through trimming. Scissors with curved tips are suitable for the trimming of these plants.
Creative Plant Rearrangement (Sozo Haishoku)
Even in Nature Aquarium that is created with long term maintenance in mind, when the condition of the substrate deteriorates, aquatic plants age and their growth becomes poor after a while. When this happens, an aquarium is often emptied out and a layout is recreated from a scratch. However, recreating a new layout through creative plant rearrangement (Sozo Haishoku) by leaving the frame of composition as is and planting new aquatic plants is another way to enjoy Nature Aquarium. Basically, Sozo Haishoku is limited to an Iwagumi layout in which its composition materials do not move easily. If you have an Iwagumi layout that you are pleased with, you can try for a variety of layout possibilities by changing aquatic plants. Here’s what you do: First, remove fish and shrimp from the aquarium and drain the water completely. Leave the rock arrangement in tact and remove the aquatic plants around it. If the substrate material is relatively new, add some Aqua Soil on the substrate surface and plant new plants. If the substrate is old, remove the Aqua Soil around the rocks carefully with a spoon or another tool so as not to move the rock arrangement. Place new Power Sand and Aqua Soil and plant with aquatic plants. I recommend that you give it a try as an ultimate way to enjoy Nature Aquarium.
Trimming Method
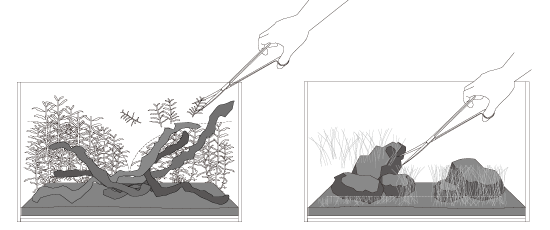
Trimming Scissors or Pro-scissors should be used for trimming depending on the type of aquatic plants and their placement. Stem plants can be trimmed relatively easily by shaping bushes with Trimming Scissors using driftwood as a guide. Curved Trimming Scissors or scissors with curved tips, such as Pro-Scissors ‘Nude’ or ‘Wave’, are easier to use when trimming Hair Grass short.
floraquatica
Friday, April 21, 2000
Thursday, April 20, 2000
Nature Aquarium Basics | Plants Nutrients
Supplementing nutrients is necessary for the healthy growth of aquatic plants. However, for the effective result and not become backfire we should know how to supplementing nutrients properly on the aquarium plants.
It is probably quite natural to feel that we should add nutrients to an aquarium after planting aquatic plants in it. Although terrestrial plants are often encouraged to grow with fertilizers, they can only grow if they receive sufficient light and moisture. The same thing is true with aquatic plants. We must first create the environment to grow them in an aquarium. Nutrients become necessary only when various requirements, such as the substrate, lighting, filtration, water temperature, and CO2 addition, are met. If nutrients are added blindly to an aquarium at the beginning, aquatic plants cannot take them up and instead algae will proliferate due to excess nutrients in the water. If we provide adequate growing conditions for aquatic plants first and then supplement with proper nutrients, the aquatic plants will grow well.
Aquatic plants need nutrients such as nitrogen, phosphorus, and potassium, and trace elements such as iron. Although nitrogen and phosphate are needed in large quantities, these nutrients tend to exist excessively in an aquarium because they are supplied by fish waste and uneaten fish food. On the other hand, potassium and trace elements are often in a short supply. One of the basic principles of nutrient supplementation in Nature Aquarium is to encourage plants to take up the excessive nutrients by supplementing lacking nutrients.
The Use of Liquid Fertilizers
The use of liquid fertilizer is the most convenient way to supplement an aquarium with nutrients. Although various liquid fertilizers are available lately, those that contain nitrogen and phosphate require some extra attention. Nitric acid (NO3) and phosphate (PO4), which originate from fish waste, uneaten food, or Power Sand in the substrate, exist in an aquarium. Although these nutrients are normally absorbed by aquatic plants, they can encourage algae to flourish if found in excess. Therefore, a type of liquid fertilizer that does not contain nitrogen and phosphorus is appropriate for normal use unless there are no fish in the aquarium or the aquatic plants are growing densely and nitrogen and phosphorus are in a short supply. Green Brighty STEP 1 through STEP 3 are not likely to cause algae to develop since they have no nitrogen or phosphorus. Green Brighty contains deep sea water that contains all the essential minerals required for plant growth in addition to the major trace elements such as iron, magnesium, and manganese. Brighty K is a liquid fertilizer that supplements only potassium. Potassium should be added daily since it promotes the photosynthesis of aquatic plants.
Basic Approach for Nutrient Supplementation
Aquatic plants cannot absorb necessary nutrients generally unless the nutrients are available in a good balance. Even if nitrogen (N) and phosphorus (P) exist excessively in an aquarium, the plants cannot absorb them if one of the other essential nutrients is lacking. Therefore, our basic approach is to supplement potassium and trace elements to encourage aquatic plants to absorb other nutrients.
The Use of Solid Fertilizers
Another type of fertilizer often used in Nature Aquarium in addition to liquid fertilizer is solid fertilizer that is inserted into the substrate. Power Sand that is used when the substrate is built will initially provide the basic nutrients. However, it loses its effectiveness in about one year. Using this timing as a guideline, the substrate can be supplemented with nutrients by inserting Multi Bottom or Iron Bottom. Multi Bottom is a stick type of solid fertilizer. Its surface is coated with trace elements. Once inserted into the substrate, it releases its nutrients slowly which in turn are absorbed by the roots of aquatic plants. Supplementing the substrate with nutrients is especially effective for rosette plants with strong root systems, such as Cryptocoryne and Echinodorus. In addition, Iron Bottom is effective for the family of Echinodorus, which has leaves that tend to bleach when iron is deficient. It is important to insert these solid fertilizers deep into the substrate. If a fertilizer stick is placed shallowly in the substrate or exposed in the water column, its nutrients leach into the water column and may cause cloudy water or algae to flourish. The use of Bottom Release enables you to insert it deep into the substrate securely.
The Use of Liquid Additives
While liquid fertilizers are added to an aquarium basically once a day, there are other additives that are used to solve a specific problem. For example, Green Gain contains naturally extracted plant hormones and highly concentrated trace elements which encourage aquatic plants to develop new shoots. Adding this product right after planting or trimming is effective for promoting the development of new shoots. ECA is fortified with iron and effective for improving the whitening of the leaves and new buds of aquatic plants. Iron is known to be absorbed and used by aquatic plants to synthesize photosynthetic pigments such as chlorophyll and carotenoid. Consequently, it not only improves a bleaching problem but also brightens up the green color of aquatic plants and intensifies the red color of reddish aquatic plants. The organic acids contained in ECA help aquatic plants to absorb nutrients through the surface of their leaves. Therefore, it would be more effective when used with a daily liquid fertilizer. Although adding any of these additives at a relatively small amount produces a good result, it can stain the water if a large amount is added or if it gradually builds up in an aquarium.
The Combinations and Dosage of the Liquid Fertilizers
The type of liquid fertilizer to be used depends on how long an aquarium has been set up and the growing condition of aquatic plants in it. The combination of Green Brighty STEP1 and Brighty K is a basic one for the early period after setting up an aquarium. Nitrogen and phosphorus tend to become excessive especially in the initial setup period of an aquarium, and supplementing potassium and trace elements encourages aquatic plants to take up the nutrients. The fertilizers should be switched to the combination of Green Brighty STEP2, which is trace elements fortified especially with iron, and Brighty K at three months after the setup when aquatic plants start growing vigorously. An addition of ECA is beneficial if the leaves of aquatic plants begin to bleach or if you wish to intensify the color of red stem plants. Since the amount of nutrients that aquatic plants absorb increases as the plants grow denser during this period, the amount of fertilizers added to the aquarium should be increased as well. Nitrogen and phosphorus may become deficient if only a small number of fish are kept in an aquarium with densely growing heliophytic aquatic plants. In such a case, heliophytic aquatic plants will grow better if the fertilizers are switched to Green Brighty Special LIGHTS. Also available is Green Brighty Special SHADE that is suitable for sciophytic aquatic plants.
Encouraging the Absorption of Nutrients
One of the principles of nutrient supplementation in Nature Aquarium is to add the nutrients that aquatic plants need when they need them. Although it is ideal to add a small amount of nutrients several times a day, it is more practical to add the required amount once a day every morning when the light comes on, provided that CO2 is added to the aquarium and lighting is adequate as well. Aquatic plants must be photosynthesizing and getting the energy necessary for growth in order for them to absorb the added nutrients. Aquatic plants sometimes fail to grow well even when adequate amounts of light and CO2 injection are available. In such a case, the cause may be the high total hardness of the water, which interferes with the aquatic plants’ nutrient absorption. Although it depends on the type of rocks, when rocks are used as composition materials, calcium and magnesium contained in the rocks leach in water and raise the total hardness. When a large amount of these elements exist in water, they interfere with the absorption of iron and other trace elements by aquatic plants and cause their leaves to turn white. In such a case, reducing the total hardness by installing Softenizer enables the aquarium plants to grow better.
Tuesday, April 18, 2000
Nature Aquarium Basics | CO2 Injection
Why is CO2 injection necessary for Nature aquarium?
Aquatic plants perform photosynthesis when light shines on their leaves. They use water and CO2 (carbon dioxide) as raw materials and produce glucose, oxygen and water through photosynthesis. Aquatic plants use the glucose to grow and release the oxygen, which is then used by fish and microorganisms for respiration. Among the raw materials for photosynthesis, water exists abundantly in an aquarium but CO2 may become deficient. CO2 is supplied to an aquarium by diffusion at the water surface and through the respiration of fish and microorganisms.
When a large number of aquatic plants are planted in an aquarium under a strong light, the plants consume CO2 rapidly through photosynthesis. This causes CO2 depletion and the plants stop photosynthesizing. If this condition persists, the aquatic plants cannot grow up healthy and dense. In Nature Aquarium, CO2 is injected into an aquarium to prevent this condition and to promote the photosynthesis of aquatic plants. If the volume of aquatic plants in an aquarium is small or the lighting is dim, it does not make sense to inject a large amount of CO2. On the other hand, if an entire aquarium is planted with aquatic plants and bright lighting is provided, sooner or later CO2 will be depleted. An adequate amount of CO2 needs to be injected into an aquarium in order to enable aquatic plants to perform photosynthesis smoothly.
The equipment necessary for a CO2 injection
A variety of methods have been devised to supply CO2 to an aquarium for many years. At present, a natural injection that is both safe and efficient has become the mainstream method. A cylinder of liquid carbon dioxide is used as the CO2 source. Since the cylinder is filled with CO2 at a high pressure, an aquarium CO2 regulator is use to discharge CO2 slowly.
The aquarium CO2 regulator is capable of depressurizing the compressed CO2 gas contained inside the cylinder and discharging it at a constant flow rate. The discharged CO2 goes through a ball valve that turns CO2 flow on and off and is then delivered to an aquarium using pressure resistant tubing. The pressure resistant tubing is connected to silicone tubing with a check valve. A glass CO2 diffuser and a glass counter, such as Pollen Glass and CO2 Glass Counter, are used to inject CO2 into the water in the aquarium. These glass components are both connected to the silicone tubing. CO2 Advanced System is a complete kit that contains all the necessary components for the CO2 injection. This set is designed for a 60 cm or a smaller aquarium. A 90 cm or a larger aquarium needs a system designed for a larger aquarium.
A cylinder selection
Small disposable cartridges and large refillable cylinders are available for the use with a CO2 injection system. Tropical Forest, which comes with the CO2 Advanced System, is a disposable cartridge. Although this 100 milliliter cartridge is small, it will last three to four weeks when used at the rate of one bubble per second using a CO2 Glass Counter for 8 to 10 hours a day, which is the proper amount for a 60 cm aquarium. Therefore, it is considered to be more suitable for an aquarium smaller than a 60 cm. A Tower/20 is more appropriate for a 90 cm or a larger aquarium. The capacity of a Tower/20 is 2 liters (equivalent of 20 disposable cartridges), which is more than adequate for a larger aquarium that requires a high injection volume. It is also compatible with a smaller aquarium such as a 60 cm aquarium. It enables you to inject CO2 without replacing CO2 cartridges for a long time and is quite economical as well. Although it requires a CO2 regulator designed for a larger system, it is well worth a consideration.
Pollen Glass selection
A difference between a CO2 injection system for a small aquarium and system for a large aquarium is the size of a Pollen Glass that diffuses CO2 in water. The sizes of Pollen Glass diffusers are determined by the diameter of the diffusion disc (white filter section). Pollen Glass and Pollen Glass TYPE-2 are the smallest diffusers designed for a 60 cm or a smaller aquarium. Pollen Glass Large 20 and 30, Pollen Glass Beetle 30, 40, and 50 are designed for progressively larger aquariums. As the size of the diffusion disc increases, the size of the aquarium that it is capable of supporting increases as well. For example, a diffuser with a 30 mm diameter disc is intended for a 90 cm aquarium, a diffuser with a 40 cm diameter disc is intended for a 120 cm aquarium, and a diffuser with a 50 mm diameter disc is intended for a 180 cm aquarium. As long as the diameter of the disc is the same, you can choose either a Pollen Glass Large or a Pollen Glass Beetle type diffuser based on the installation location and the design. Although a New Pollen Glass has the same size diffusion disc as a standard Pollen Glass, it looks sleeker, fitted with its own joint glass (supplied with the diffuser) and smaller suction cups. You can select either a Pollen Glass Large 30 or a Pollen Glass Beetle based on your preference on the design since they both have the same 30 cm diameter diffusion discs.
Installing a Drop Checker
A CO2 injection volume is measured by counting the number of CO2 bubbles using a CO2 Glass Counter (or a CO2 Beetle Counter for a large aquarium) and adjusted with a Speed Controller. The proper injection rate varies depending on the type and the denseness of the aquatic plants. A Drop Checker provides a good reference for determining if the CO2 injection volume is adequate or not. The pH of an aquarium that is planted with aquatic plants varies depending on a CO2 injection volume and the CO2 uptake level of the aquatic plants through photosynthesis. If the CO2 injection volume is high, the pH is more acidic. If it is low, the pH is more alkaline.
A Drop Checker is a CO2 detectors, a device that measures the CO2 concentration in an aquarium using this characteristic. It is installed inside an aquarium holding a small amount of the aquarium water and pH indicator in its glass bulb. CO2 injection volume is considered adequate if the color of the solution inside a Drop Checker looks blue (alkaline) in the morning when the light comes on, and appears green (slightly acidic) in four to five hours later when aquatic plants are photosynthesizing most vigorously. If the color remains blue, CO2 injection is insufficient. If it appears more yellow than green, it is excessive. The aquarium should be aerated at night when the light is turned off in order to prevent hypoxia.
A Drop Checker is an apparatus that indicates the CO2 concentration. It takes advantage of the characteristic that the pH of aquarium water comes to equilibrium with the pH of the water contained in the apparatus to which pH indicator is added via the air inside the apparatus. When CO2 dissolves in water, the pH of the water becomes acidic (the color of the solution turns yellow from green.) When CO2 is dispersed out of the water, pH becomes alkaline (the color of the solution turns blue.)
Pollen Glass maintenance
A Pollen Glass is a device that ultimately diffuses CO2 in water. The white diffusion disc of a Pollen Glass is a special glass filter with very fine openings, which releases CO2 into the water in the form of minute bubbles. These tiny bubbles dissolve in water while drifting in the current inside an aquarium or rising toward the water surface. Since a Pollen Glass is always submerged in an aquarium, algae will grow on its surface and sooner or later it will start to appear unsightly just like any glass surface or a rock and other composition materials. In the case of a Pollen Glass, algae on it not only appear unsightly but can also clog the diffusion disc and cause the bubble size to increase, resulting in poor diffusion efficiency.
The great advantage of Pollen Glass diffusers is that they are entirely made of glass. Glass is resistant against strong acids and alkalis and does not degrade over time. Therefore, algae on a Pollen Glass can be removed easily by soaking the diffuser in the alkaline cleanser Superge that is made for this purpose. A Pollen Glass can be used in a nearly new condition indefinitely. Cleaning a Pollen Glass once a week or every two weeks is recommended for maintaining the optimum diffusion capability.
Labels:
CO2 Injection,
CO2 Regulator,
Nature Aquarium Basics
Monday, April 17, 2000
Nature Aquarium Basics | Lighting for Aquatic Plants
Why is Nature Aquarium Lighting necessary for Aquatic Plants? Light is essential for growing aquatic plants not only in Nature Aquarium but in any aquarium. Green plants, which include aquatic plants, capture light on their leaf surfaces and perform photosynthesis. Photosynthesis is a mechanism with which plants synthesizes glucose from CO2 and water using light energy. Oxygen is produced as its byproduct. Photosynthesis is not only essential for the healthy growth of aquatic plants but it also supplies oxygen to fish and microorganisms.
Lighting in aquarium plants has the same role as the sun in natural ecosystems. Natural sunlight is hard to utilize in an aquarium depending on the place of installation or due to the fact that the intensity and duration of sunlight cannot be controlled easily. If strong, direct sunlight shines into an aquarium, algae may grow on aquatic plants. Phytoplankton also tends to proliferate and this results in green water. Therefore, artificial lighting becomes necessary. However, it does not mean that just any light will do.
Besides providing light to aquatic plants for photosynthesis, lighting has another purpose of illuminating an aquarium beautifully for viewing as well. The colors of aquatic plants and fish do not appear beautiful with a red grow light designed for terrestrial plants or lights intended for indoor lighting. An aquarium requires the light that makes a layout appear beautiful and still promotes photosynthesis.
Lighting for aquatic plants
Nature Aquarium Lamp (NA Lamp) was developed for growing aquatic plants beautifully and displaying a layout attractively. The white color of normal fluorescent light is produced by mixing three primary colors of light: red, green, and blue. Various shades of white light, from reddish white to bluish white, can be produced by mixing varied amount of the three primary colors of light.
While many plant grow lights emit red light, red light diminishes rapidly in water and therefore is not very effective in growing aquatic plants. As it turns out, a blue light passes through water very well and promotes the photosynthesis and growth of aquatic plants. However, since the colors of aquatic plants and fish do not appear pretty with a blue light alone, red and green lights need to be added in a good balance while increasing the proportion of the blue light. Through various trials and errors, 8000K color temperature was adopted finally for the NA Lamp.
The NA Lamp that promotes the photosynthesis of aquatic plants and has a high color rendering ability at the same time made it possible to create beautiful Nature Aquarium. The concept of this light for aquatic plants was applied to metal halide lamps as well as fluorescent lamps.
Nature Aquarium Lighting
It is necessary to provide a sufficient amount of light to Nature Aquarium where beautiful layouts are created by growing aquatic plants densely. The intensity of light that is suitable for growing aquatic plants depends on the type of aquatic plants. Since heliophytic aquatic plants that demand bright light are often combined with sciophytic aquatic plants that can be grown without a lot of light in a layout, the intensity of the light is normally matched with the requirement of the heliophytes as much as possible. In the case of fluorescent NA lamps, the lamps are installed basically by covering the top of an aquarium with them. (For example, four-20W lamps for a 60 cm aquarium, six-32W lamps for a 90 cm aquarium, etc.) In the case of a metal halide lamp, one NA Lamp (MH-150W) can illuminate the entire 90cm aquarium with bright light.
Fluorescent lamps and metal halide lamps have different characteristics in the way that a layout appears under them. Fluorescent lamps envelop the entire aquarium softly with light without casting much shade, and therefore stem plants appear especially beautiful. On the other hand, a metal halide lamp shines directly and casts well-defined shadows. It is good to keep such properties of light in mind when planting aquatic plants.
Grand Solar I can recreate the light environment that is ideal to Nature Aquarium by switching or combining the intense light of the metal halide lamp and the softer light of the power compact fluorescent lamps. The metal halide lamp and power compact fluorescent lamps are both produced to NA lamp specifications.
Lighting fixture installation
Since Solar I for a metal halide lamp is a pendant type fixture, the space above an aquarium is open and the water surface is visible. This enables an open top aquarium in which driftwood and aquatic plants can protrude above the water surface. Since the water surface is visible, it not only creates a feeling of openness but also makes it easier to do the daily maintenance such as feeding and fertilizing and other maintenance such as water changes and trimming. Pendant type Solar II and Grand Solar II with power compact fluorescent lamps or Grand Solar I that combine the characteristics of a metal halide and fluorescent lamps are also available. However, one must note that a pendant type light fixture must be installed with a special stand or be hung from the ceiling directly.
Proper brightness for an aquarium
In the case of a pendant type Solar I, the standard distance between the water surface and the fixture is 30 cm. The brightness can be adjusted by changing the distance from the water surface. Solar I is typically used for a 90 cm aquarium. If more light is required over the entire aquarium, Grand Solar I is recommended. Grand Solar I comes with one 150W metal halide lamp and two 36W power compact fluorescent lamps, which can be lit at the same time or individually.
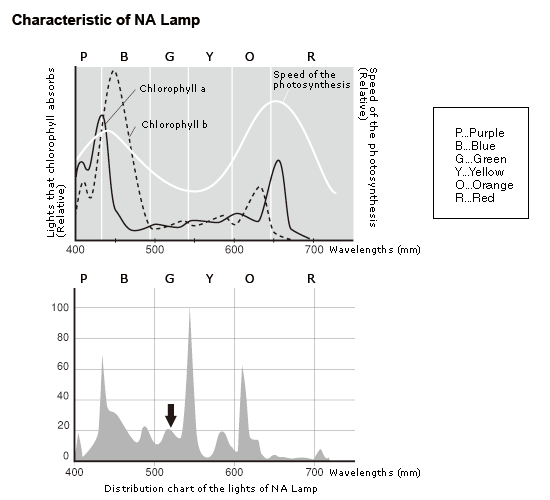
The light of an NA lamp has a high transmittance in water. It is fortified with the blue spectrum and with the wavelengths that chlorophyll absorbs well to promote the photosynthesis of aquatic plants. Additionally, it reproduces the natural colors of aquatic plants and tropical fish realistically. The green color of aquatic plants appears vivid especially because of the peak that is indicated by the arrow on the spectral distribution chart.
Lighting period
The light period of 8 to 10 hours per day is considered optimum for Nature Aquarium empirically. If the lighting period is shorter than this, aquatic plants don’t grow well or stem plants tend to get leggy. On the other hand, if it exceeds 10 hours, algae tend to multiply or aquatic plants stop photosynthesizing even when the light is still turned on.
Aquatic plants generally grow well if the light is turned on regularly every day during the daytime hours. An irregular light period can affect their condition adversely. In addition to being very bright, the metal halide lamp and power compact fluorescent lamps on Grand Solar I can create a near natural light environment since they can be controlled individually (the two fluorescent lamps operate simultaneously).
A time period in which light penetrates water so that it is bright enough for aquatic plants to photosynthesize in nature is rather limited. There are time periods before and after the brightest period around noon in which the light intensity is lower. To recreate these conditions in an aquarium, the lighting period of the power compact fluorescent lamps of Grand Solar I should be set to 10 hours and that of the metal halide lamp to 6 to 8 hours within the lighting period of the power compact fluorescent lamps.
Saturday, April 15, 2000
Nature Aquarium Basics Filter Instalation
The function of a filter
When a layout is produced and water is added to an aquarium, a filter must be provided to clean the water. Although various types of filters are available for an aquarium, external filters are used mainly in Nature Aquarium. An under gravel filter and a filter that is integrated in a hood are not suitable since fertilizers are used in the substrate and CO2 is injected into the water. Considering the space requirement and filtration capacity, an external filter is most suitable since it produces adequate flow in an aquarium and its construction does not drive away CO2. A filter strains particles in the water, absorbs and removes dissolved impurities, and decomposes and detoxifies harmful substances in water. As a result, the water in an aquarium stays clear, and fish and aquatic plants grow well. On the other hand, if a filter is not functioning properly, the water may become cloudy, fish tend to get sick, and algae might grow on aquatic plants making them unsightly. If the condition of an aquarium declines, the condition of its filter should be checked first. A filter is essential equipment for maintaining the environment of the ecosystem in an aquarium.
Three filtration types
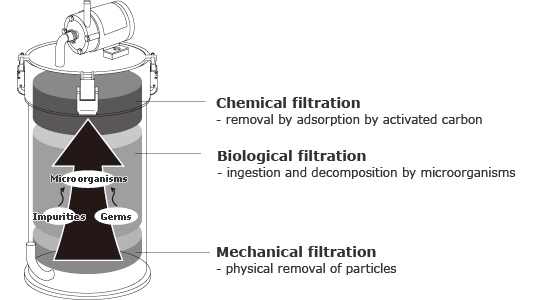
There are three major filtration methods: mechanical, chemical, and biological. Mechanical filtration removes the particles in the water physically. Filter media such as sponges are used commonly for this in an external filter. Although a mechanical filter removes fragments of aquatic plants, fish waste, and uneaten food, which are relatively large, tiny particles that cause cloudiness in water often pass through the filter. Such tiny particles can be flocculated and removed effectively by the filter with the use of ADA’s water conditioner, Clear Dash. Chemical filtration removes dissolved impurities in water by the adsorption ability of activated carbon. Activated carbon (such as NA Carbon) is often used initially as a part of filter media since it purifies water by adsorbing the causes of discoloration of water and ammonia (that is harmful to fish), which are often generated during the initial period after an aquarium is set up. Since activated carbon has a limited adsorption capacity, it should be replaced every two weeks as a general rule to maintain its effectiveness. Biological filtration, which is done mainly by bacteria and protozoa, decomposes organic materials, ammonia, and nitrite in water.
The importance of biological filtration
Among the three discussed above, biological filtration is the most important method for Nature Aquarium. Microorganisms in the filter ingest and decompose organic matter, algae (phytoplankton), and germs floating in water. Although the ammonia that is contained in fish waste is harmful to fish and shrimp at high concentrations, it is rendered harmless as it is converted to nitrite and then to nitrate with the help of nitrifying bacteria. It is then taken up as a nutrient by aquatic plants. The work of these microorganisms is seen in natural ecosystems as well. As long as the biological filter is functioning stably, the organic matter and the harmful ammonia that are generated from it are decomposed rapidly, and the Nature Aquarium environment can be maintained well for a long time. Mechanical and chemical filters can be considered supplementary until a biological filter becomes established. When a filter is set up with new media, it takes two to three weeks until the biological filtration functions adequately. In the meantime, the biological load in the aquarium can be lessened by the use of chemical filtration with activated carbon and frequent water changes.
The selection of an external filter
There are mainly two important considerations for selecting an external filter. One is the capacity of a canister that holds the filter media. If a flow rate is the same, the filtering capacity increases as the volume of media increases. However, in actuality, increasing the volume of media alone puts stress on a pump and reduces its flow rate. If a canister size is increased, it takes up more space. Therefore an adequate size canister should be selected depending on the aquarium size and the number of fish in it. Super Jet Filters are available in standard size, EX size that is 1.5 times larger than the standard, and EX2 size that is two times larger than the standard. A standard size Super Jet Filter provides an adequate filtering capacity in most cases since its capacity is larger than competitors’ external filters. Another important consideration is pump performance. A higher flow rate is not always better. A pump with adequate flow for the size of aquarium and adequate head to lift water ensures stable filtration performance over a long period of time without losing flow rate under load.
The characteristic of media
Although various types of filter media are presently available, the majority of media can be divided largely into biological filtration media and activated carbon for chemical filtration. In Nature Aquarium, Bio Rio and Bio Cubes are used as biological filter media. These provide large surface areas through a high number of pores and their mesh structure. A larger surface area generally means better filtering capacity since it provides more area for filter bacteria to colonize. Filter media must be highly water permeable since it would not do much good if its pores are not exposed to water. As stated earlier, the biological filtration will become the main filtration eventually. However, chemical filter media should also be used when an aquarium is initially set up since it takes a little bit of time until the biological filter is well established. Activated carbon such as NA Carbon and Bamboo Charcoal is used for this. Since activated carbon has a limited adsorption capacity, it needs to be replaced periodically to maintain its effectiveness. Since NA Carbon and Bamboo Charcoal are highly permeable and do not clog easily, they can be left in filters and utilized as biological filter media.
Water flow in Nature Aquarium
Although strong water flow is not desirable since it dislodges planted aquatic plants or causes them to sway, adequate water flow is essential for growing healthy aquatic plants. Water current prevents dirt from collecting on the surface of leaves and keeps aquatic plants healthy and beautiful. Aquatic plants absorb CO2 from the surface of their leaves as they photosynthesize and grow. Since CO2 does not diffuse well in water, it may run short locally around plant leaves if the water is stagnant even when it is injected in the water. The water current supplies CO2 rich water around the leaves and facilitates photosynthesis. The same thing is true for liquid fertilizers. Since Super Jet Filters are equipped with good pumps that have good head pressure, the water flow does not decrease easily when the filter media becomes clogged. However, their media should be cleaned periodically. Media cleaning is easy. Take a bucket of water and simply submerge the Bio Rio or other media. Most dirt is removed without scrubbing by lifting the media out of the water. You can really see that the water flow is restored to the original level after media cleaning.
A set of Lily Pipes that are installed on the inlet and outlet of an external filter create adequate water flow in an aquarium.
Nature Aquarium Basics | The Production of a Layout
The Selection of Composition Materials
Once the aquarium substrate is laid, the next step is producing a layout. As for the order of production, the framework of a layout is built by arranging composition materials such as driftwood and rocks, and then aquatic plants are planted from the foreground to middle ground to the background. First, an aquarium and substrate are prepared according to the concept of the layout that was established before the production. The next step is to select composition materials. Although the decision to use driftwood or rocks as composition materials is made generally at the concept stage, you may not be able to obtain exactly what you have in mind since they are natural materials. You may have to modify slightly the composition that you envisioned depending on the sizes and shapes of the composition materials you obtain. It often results in a more natural looking layout if you are flexible with your composition to take advantage of the material you have rather than getting hung up on the design that you envisioned initially. Regardless of driftwood or rocks, multiple materials are arranged together generally to produce a layout. Except for an open top aquarium in which driftwood is protruding for the water surface, you should select composition materials that fit inside an aquarium basically and leave enough space to plant aquatic plants when arranged. It is important to select the composition materials by considering the balance with the size of an aquarium rather than their shapes.
Basic compositions
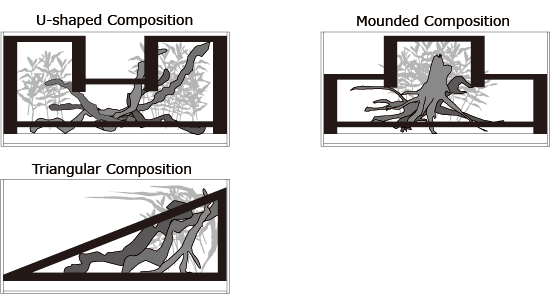
In Nature Aquarium, the composition of a layout is produced based on the arrangement of the area with densely growing aquatic plants and the empty space. Although limitless numbers of layout compositions can be produced, there are three Nature Aquarium Basic Compositions. One of them is the U-shaped composition. Looking at an aquarium from the front, bushes of aquatic plants are located in the left and right sides of the aquarium and the empty space is in the center. This composition is well suited for expressing perspective since the empty space appears to narrow from the front to the rear center of the aquarium. The second one is the mound-shaped composition with the bush of aquatic plants in the center and empty spaces in the left and the right sides of the aquarium. Because the focus is in the center, this composition is suitable for a layout with a strong impact or with a dramatic expression. The third one is a triangular composition. Bushes of aquatic plants are placed either in the right or the left side of an aquarium and the empty space is created in the opposite side so that the layout appears as a right triangle from the front of the aquarium. Since this composition can be viewed not only straight from the front of the aquarium but also from the side with the empty space in an angle, it is also suitable for a cube type aquarium placed in a corner of a room. Although the actual layout composition may not necessarily work out to be one of the basic compositions, it is easier to put a composition together if the composition is produced initially with a basic one in mind.
Preparation of driftwood and rocks
Since driftwood and rocks that are composition materials in Nature Aquarium are both natural materials, not only their shapes but also their quality are not uniform. Sometimes they present a problem that needs to be addressed before or after a layout is produced. In the case of driftwood, if it is too dry, it floats and cannot be used in a layout. Although a rock can be placed on top of it, we recommend that you check first if purchased driftwood floats or not. If it floats, the driftwood should be soaked in a bucket of water for awhile. When driftwood is placed in an aquarium, the water sometimes turns brown right after setting up the aquarium. This problem can be alleviated if the driftwood is soaked in water for awhile. It is not necessary to boil or pour hot water on Old Black Wood from the tropics to remove tannin. It should never be boiled as a matter of fact since the natural resin in the driftwood seeps out like black tar and becomes unmanageable. In the case of rocks, it is not necessary to prepare them before use. Depending on the type of rocks, it may increase the total hardness of the water after setting up an aquarium. If the total hardness increases significantly and hinders the growth of aquatic plants, we recommend installing Softenizer.
There are three basic Nature Aquarium compositions: U-shaped composition, mounded composition, and triangular composition. The framework by composition materials, bushes of aquatic plants, and the placement of an empty space define a composition. It is important to consider the volume of aquatic plants and the balance of their colors and placement so that the composition is not bilaterally symmetrical.
The Selection of Aquatic Plants
Once the composition materials are arranged in an aquarium, the next step is to plant aquatic plants. In Nature Aquarium, the space for aquatic plants is divided into mainly three areas: the foreground, the middle ground, and the background. As a general rule, short aquatic plants are planted in the foreground and tall aquatic plants are planted in the background. Medium height plants and aquatic plants that grow attached to driftwood and rocks are planted in the middle ground. By arranging aquatic plants this way, three dimensional appearance and perspective can be expressed in the limited space of an aquarium. Therefore, when selecting aquatic plants for a layout, it is necessary to understand how a particular aquatic plant grows and place it in an appropriate area. Not only the height of an aquatic plant, but also its form, speed of growth, and light requirement need to be considered as well. Heliophytes such as stem plants that require bright light grow fast in general and require frequent trimming. Sciophytes such as Cryptocoryne do not require bright light and their growth rate is relatively slow. Heliophytes are suitable for the foreground and the background where light reaches well, and sciophytes are suitable for the middle ground that tends to be shaded by driftwood and rocks or the aquatic plants in the background.
Planting of Aquatic Plants
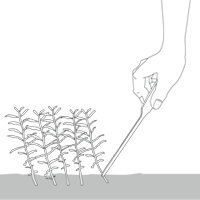
The majority of aquatic plants except for mosses and ferns are planted using tweezers. Whereas just one or two aquatic plants can be planted by hand, planting aquatic plants densely in the foreground or producing a layout with an intricate design is impossible without tweezers. Forms of aquatic plants include stem plants with long stems with leaves and rosette (root) type in which leaves and roots grow closely together. In the case of stem plants, plants are aligned at the terminal buds and cut to the same length. Then their lower leaves are removed and the plants are planted with tweezers made for aquatic plants. If three to four thin stem plants are held together at this time, plants can easily be planted densely. Rosette plants such as those in the Cryptocoryne family can easily be planted using a triangle or curved type Pro-Pincettes. If a rootstock is very large and difficult to plant with tweezers alone, it helps to hold the rootstock with Sand Flattener or pour Aqua Soil on top of it. The plants that spread with runners are cut into easy-to-plant sections, and the sections are planted with a small space between plants, keeping them a small distance away from the glass surface. It is difficult to plant aquatic plants after filling the aquarium with water since aquatic plants tend to float due to their buoyancy. Placing just enough water to soak the substrate and then planting them from the front of the aquarium toward the back makes the work much easier.
Stem plants should be inserted into the substrate at an angle rather than perpendicularly so that they won’t easily come loose due to their buoyancy when the aquarium is filled with water.
In Nature Aquarium, a layout is divided into three areas: foreground, middle ground and background. Aquatic plants are selected by type and planted so that their height increases gradually from front to rear of an aquarium. As a general rule, aquatic plants are planted one by one using tweezers. Small aquatic plants used in the foreground and thin-stemmed aquatic plants can be planted densely if a few of them are planted together.
Epiphytic plants
In a layout produced with driftwood as a composition material, epiphytic aquatic plants are secured on the driftwood after planting aquatic plants in the substrate. The aquatic plants used for this purpose are mainly ferns such as Microsorum and Bolbitis. Anubias nana is sometimes used as well. These aquatic plants are secured with Wood Tight to the places that become focal points of a layout. Wood Tight can be removed once the plants become attached. If they are to be placed at the boundary of driftwood or rocks and the substrate, the plants should be secured to small rocks with Wood Tight and placed at the boundary. These epiphytic plants grow attached to driftwood and rocks in nature as well. Planting them directly in the substrate is not ecologically sound. In addition, when attaching Willow Moss on driftwood, it is easier to attach it after arranging driftwood and before planting aquatic plants. Willow Moss, which is a type of moss, should be spread thinly over the area where you want it to grow and secured using Moss Cotton. The Moss Cotton should melt away naturally by the time Willow Moss is attached to the driftwood. Fuji-Ishi rocks have a lot of indentations and very little surface area with which Willow Moss can make good contact. Since Willow Moss does not grow attached to them in a short period of time, Riccia Line should be used to attach it to the rocks as in the case of Riccia which is not epiphytic.
Nature Aquarium Basics | Setting the Substrate
The Significance of the Substrate
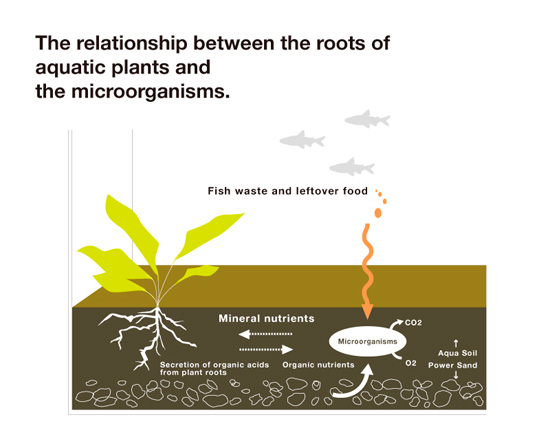
In Nature Aquarium, the gravel on the bottom where aquatic plants are planted is called the substrate. The substrate has three major purposes. One is to support aquatic plants and provide nutrients. Another is to enable microorganisms to multiply and stabilize the environment of an aquarium. The third is to render a natural feel to a layout. The activity of microorganisms is especially important since organic matter, such as fish waste and uneaten food that falls into the substrate, is decomposed by the microorganisms that are fully established in the substrate. In addition, the roots of aquatic plants and the microorganisms in the substrate have a type of symbiotic relationship. Aquatic plants can grow healthfully only when microorganisms help them absorb nutrients through roots. When aquatic plants grow densely by absorbing nutrients that are broken down from organic matter, the uptake of nutrients from the leaf surfaces and the release of oxygen through photosynthesis become vigorous as well, and the environment in the aquarium stabilizes. Therefore, the present substrate system was developed for Nature Aquarium for the purpose of growing beneficial microorganisms in the substrate to encourage the healthy growth of the roots of aquatic plants. The concept of natural ecosystem is utilized in the Nature Aquarium substrate, which is based on the mutual relationship of soil environment, microorganisms, aquatic plants and fish.
Nature Aquarium Substrate
It is important to grow microorganisms in Nature Aquarium substrate. The beneficial microorganisms in the substrate include bacteria, fungi, and protozoa. The supply of organic matter, which is their food, and oxygen are essential for encouraging their growth and activities. Power Sand was developed to provide the organic matter and to improve water permeability in the substrate. Power Sand, which is natural pumice with porous surfaces and treated with aged plant-based organic matter, is suitable for growing and establishing microorganisms. When Power Sand is laid at the very bottom of the substrate, the organic matter is broken down by multiplying microorganisms and supplied as nutrients to the roots of aquatic plants. The basic substrate setting is to place Aqua Soil on top of Power Sand. Among Aqua Soils, Amazonia is rich in organic acids and trace elements, and aquatic plants grow their roots in it rapidly. Spreading roots turn over the substrate and bring oxygen rich water into the substrate. This encourages the activities of aerobic microorganisms and establishes the environment in the substrate rapidly.
Explanation of figure 01
To build the substrate with cosmetic sand, first draw a boundary line on the bottom of the aquarium with a permanent marker and secure a cardboard divider with packing tape along the boundary line. Place cosmetic sand such as Forest Sand in the front of the divider, and place various additives, Power Sand, and Aqua Sand, respectively, behind the divider. After matching the heights of the cosmetic sand and Aqua Soil across the divider and smoothing the substrate surfaces, pull out the cardboard divider. Lastly, place the small rocks (such as Fuji-Ishi wrapped with Willow Moss) along the boundary line to prevent Aqua Soil from toppling over the cosmetic sand. This completes the substrate laying work.
Further Improvement of the Substrate Environment
Although the combination of Power Sand and Aqua Soil constitutes the basic substrate system, various substrate additives are used to further improve the environment in the substrate. The most basic additives are Bacter 100 and Clear Super. While microorganisms emerge naturally with Power Sand alone, it takes time. The use of Bacter 100 that contains dormant soil microbes allows beneficial microorganisms to develop faster in the substrate. Since powdered charcoal-based Clear Super that contains organic acids becomes food for the microorganisms during their initial development period, it is sprinkled at the bottom of the substrate along with Bacter 100. A Growth Plate is a device that maintains the environment of the substrate in a good condition. When the temperature decreases in winter, there will be a difference in temperature between the water column with a heater and the substrate, and the water flow within the substrate becomes stagnant. If the temperature of the substrate is significantly low, the root growth of aquatic plants slows down as well. A Growth Plate, which is equipped with a heater and a thermostat inside, warms the entire substrate gradually and promotes the water circulation and the root growth of the aquatic plants.
How to Build the Substrate
There are many ways to build the substrate. The simplest one is to build the substrate by laying Aqua Soil on top of Power Sand. The majority of aquatic plants grow well with this combination. A more meticulous way to build the substrate is to first scatter substrate additives (Bacter 100, Clear Super, Penac W, Penac P, and Tourmaline BC) on the bottom of an empty aquarium, and then place Power Sand, Aqua Soil, and Aqua Soil Powder Type, respectively, on top. In either case, Power Sand should be placed 1 to 2 cm away from the front glass so that it is not visible from the front of the aquarium. Placing Aqua Soil low toward the front and sloping it higher toward the rear with a Sand Flattener adds depth to a layout. Powder type Aqua Soil looks good when placed in a thin layer over the substrate starting from the front of the aquarium, and aquatic plants grow well in it as well. The amount of the substrate material for a 60 cm aquarium is roughly 2 liters of Power Sand and 9 liters of Aqua Soil. In the case of an Iwagumi layout, the substrate should be laid somewhat lightly initially considering the mounding of soil to be done later.
Laying a Split Substrate
A number of recent Nature Aquarium layouts have a Power Sand and Aqua Soil combination in the area where aquatic plants are planted and cosmetic sand such as Forest Sand in the foreground section. Although the growth of aquatic plants in Forest Sand or other sand is not very good, the sand is used for a cosmetic purpose since the sand gives off a natural feel and looks beautiful. However, if the sand is not separated well from Aqua Soil, they tend to mix and look unsightly. The area for cosmetic sand depends on the composition of a layout. The boundary for the area should be marked on the bottom of an aquarium with a permanent marker according to the composition that you wish to create. Then a cardboard divider should be placed along the boundary with packing tape. Some substrate materials should be placed on both sides of the divider to secure it in place, taking care not to let the divider fall over. Then the rest of the substrate materials should be placed. When the height of the cosmetic sand is matched with the height of Aqua Soil at the boundary, gently pull out the divider leaning it somewhat toward the rear of the aquarium. This will produce a cleanly separated substrate. Placing small rocks at the boundary can prevent the Aqua Soil from toppling toward the front.
Maintaining the Substrate
Nature Aquarium is supposed to be maintained over a long time. While it is maintained, its substrate cannot be replaced. Therefore the substrate needs to stay in good condition as long as possible. The nutrients contained in Power Sand are absorbed by aquatic plants and run out in half a year to a year. Using this as a guideline, nutrients should be replenished with Multi Bottom or Iron Bottom. Although fish and shrimp excrements fall into the substrate, microorganisms in the substrate decompose them in Nature Aquarium. However, if cosmetic sand is used in the foreground, excrements and sludge collect on the sand surface and look unsightly. These should be suctioned out with a small diameter hose along with some water. In time the substrate tends to become anaerobic and blue-green algae may develop in the substrate. If this happens, blue-green algae can be controlled by injecting some Phyton-Git or Bacter 100 that is diluted in water into the substrate with a syringe. An anaerobic environment can also be improved by injecting some Penac W that is diluted in water.
Subscribe to:
Posts (Atom)